

Mailchimp Send Email To One Person
Create a Regular Email Campaign
A campaign is a marketing message that you share through email, ads, or some other channel. In Mailchimp, a regular email is a bulk email campaign sent to many contacts at once. When you create a regular email, you'll use a checklist-style campaign builder to add recipients, choose your settings, and design your content.
In this article, you'll learn how to create and send a regular email campaign in Mailchimp.
Before you start
Here are some things to know before you begin this process.
- To send an email, make sure you have subscribers in your audience. If you don't have subscribers in your audience, import your contacts or invite people to subscribe with a signup form.
- Be sure to verify your email's domain before you send your first email.
Create an email
To create a regular email, follow these steps.
- Click the Create icon.

- Click the Email drop-down.

- Click Regular.

- Enter a campaign name and click Begin.

This will take you to the builder, where you'll choose your settings and design your content.
Setup and design
Our email builder is designed to let you work on the different parts of your email in the order you choose, and review everything at once before you send.
There are four main things to do before you can send.
- Add your recipients in the To section.
- Add your from name and from email address in the From section.
- Add your subject line in the Subject section.
- Design your email in the Content section.
As each task is completed, a green checkmark will appear next to the corresponding section.

You may also want to review your tracking options and other settings.
Add recipients
To choose your recipients, follow these steps.
- In the To section, click Add Recipients.

- In the Audience drop-down menu, choose the audience you want to send to.
- In the Segment or Tag drop-down menu, choose All subscribers in audience, Group or new segment, or one of the available saved or pre-built options.

- Optional: Check the Personalize the "To" field box to display the recipient's name instead of their email address. This is more personal and may help you avoid spam filters.

After you check the box, you'll choose a merge tag that corresponds with the data you want to display in the "To" field. For example, if you choose *|FNAME|*, a recipient named Bob will see "To: Bob" instead of "To: bob@example.com." The default options are *|FNAME|*, *|LNAME|*, and *|FNAME|* *|LNAME|*, but you can click Custom to enter an alternate tag or text. - Click Save.
Send to a custom segment or group
To send a campaign to a one-off custom segment or a group within your audience, follow these steps.
- Select the audience you would like to send to in the Audience drop-down menu.
- Click Group or new segment in the Segment or Tag drop-down menu.

- Create the segment that you would like to send to. To learn more about creating segments, check out Create and Send to a Segment.

- Click Save.
Exclude contacts from a campaign
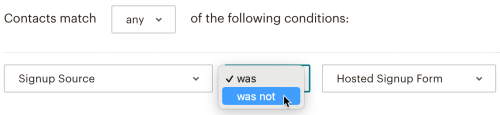
You can exclude contacts from receiving a campaign by using the segment builder. To exclude a specific segment, use the opposite of the modifier that would be used to include that segment.
For example, a segment that only includes those who joined your audience via your Hosted Signup Form would be built as Signup Source | was | Hosted Signup Form.
If you want to exclude all contacts who joined via your Hosted Signup Form, then your segment would be built as Signup Source | was not | Hosted Signup Form.
Add from name and from email address
To set your from name and from email address, follow these steps.
- In the From section of the email builder, click Add From.

- Enter your from name and email address.

You may be asked to verify the domain in your email address. - Click Save.
Add subject
To set your subject line and optional preview text, follow these steps.
- In the Subject section of the email builder, click Add Subject.

- In the Subject field, enter a subject line for your email.

- In the Preview text field, you can enter up to 150 characters that will display next to your subject line in recipients' inboxes. This field is optional.

- Click Save.
Design email
Whether you're an expert or a novice in email marketing, Mailchimp gives you tools to design beautiful campaigns. You can choose to work with the new inline email builder or use our drag-and-drop classic email builder.
To design your email, navigate to the Content section and click Design Email.

Then, choose whether you want to work with the Classic Builder or New Builder.

Here's an overview of each option.
- Classic Builder Use our classic builder to work with our many email template designs, e-commerce features, and Creative Assistant. Drag and drop content blocks as needed, or custom code from scratch. To learn how to use this builder, check out Design an Email with the Classic Builder.
- New Builder Use our new builder to add and edit content directly to your layout in a refined interface. To learn how to use this builder, check out Design an Email with the New Builder.
After you choose the same email builder twice in a row, it will become the default builder. You can manually set or change your default email builder in your Account Details.
Settings and tracking
When you create a regular email, we enable certain tracking options by default. This includes open and click tracking, as well as e-commerce tracking if you have a connected online store.
To edit your tracking options, follow these steps.
- Scroll to the Settings & Tracking section and click Edit.

- Check the boxes next to the tracking options you want to enable.
- Click Save.
Other settings
You can also choose to manage subscriber replies with your Mailchimp Inbox, and auto-convert embedded videos. To learn more, check out these articles.
About Your Mailchimp Inbox
Add Video to a Campaign
Send campaign
After you've completed the To, From, Subject, and Content sections of the email builder, you should see a green checkmark next to each. That means your regular email is ready to send immediately.

If you have a Mailchimp Standard plan or higher, you can also schedule your email. To change your plan type, visit the plans page in your account.
If you're ready to send the email to your subscribers, click Send. Then, in the Review Your Campaign modal, click Send Now to confirm your send.
Your email is on its way!
Next steps
You've sent a regular email in Mailchimp. Nice job! Now, you can view your report to watch the data roll in. To learn more, check out About Email Campaign Reports.
When you're ready to create your next email, you can also add a social post to your email to coordinate multiple marketing efforts at the same time. To learn more, check out Publish a Social Post When You Send an Email.
Paid plans can A/B test to learn more about contacts' preferences or schedule an email to send at a later time. To change your plan type, visit the plans page in your account. To learn more, check out these articles.
Create an A/B Testing Campaign Schedule or Pause a Regular Email
Troubleshooting
If your email doesn't send as expected, take a look at some of these troubleshooting resources. You can also search our guides and tutorials for other topics you want to learn about.
Troubleshooting Your First Campaign
Resolve the Default Text Content Alert
Mailchimp Send Email To One Person
Source: https://mailchimp.com/help/create-a-regular-email-campaign/
Posted by: jaramilloicia1942.blogspot.com
0 Response to "Mailchimp Send Email To One Person"
Post a Comment