

How To Change Blog Domain Name In Wordpress
WordPress: Manually Changing your Domain
Overview
There may come a time when you need to duplicate your WordPress site's content and use it on a different domain name. Perhaps you are promoting a product known by more than one name, and you would like to have separate domains for each product name.
Instead of designing a new site for each and every domain, you may choose to use the content that already exists in one of your current domains. The following article will guide you through duplicating a WordPress site.
Please be aware that following the steps below may not be enough to successfully change your domain due to WordPress's communication with the server. It is recommended that you make a full backup of your website using theBackups button in cPanel before proceeding with the remaining steps in this article.
- Step 1: Copy Files to the New Domain
- Step 2: Create a New MySQL Database
- Step 3: Edit the WordPress .config File for your New Site
- Step 4: Export the Database
- Step 5: Update the Database
- Step 6: Update the Database Tables
- Step 7: Update WordPress
Step 1: Copy Files to the New Domain
To add a new domain, Log in to your Bluehost control panel. Then complete the following steps to copy files to your new domain.
- Open the public_html folder.
- Along the top of the screen, click Select all.
- Press and hold the Ctrl key while clicking (un-selecting) the following folders in your public_html folder:
- .qidb
- cgi-bin
- addon domain folder
- With the files still highlighted, click Copy in the top menu of the File Manager. A pop-up will open showing the following path:/public_html
- Type the name of the addon domain folder to which you are copying the files. This box should now look similar to/public_html/addondomainname.com.(Replaceaddondomainname.com with the actual domain.)
- ClickCopy File(s).
Step 2: Create a New MySQL Database
Once the files have been copied over to your addon domain folder, on another screen, open theMySQL Database Wizard in cpanel. This is where you will need to create a new MySQL database.
Step 3: Edit the WordPress .config File for your New Site
To edit the wp-config.php file for WordPress, you need to log in first to your Bluehost control panel.
- Open thepublic_html folder and locate your addon domain folder.
- Right-click on thewp-config.php file and clickCode Edit or Edit button.
- When this page opens, edit the following information to reflect the values assigned to the new database created in the previous step.
- DB_NAME
- DB_USER
- DB_PASSWORD
- Click theSave Changes button.
Your wp-config.php file should now reflect the correct database name, database user, and database password. This is essential for WordPress to know which database to obtain the information from.
Step 4: Export the Database
Export the database from the primary domain and import it into the newly created database. For help with this process, please refer to the following articles:
- How to Import or Export a Database with phpMyAdmin
Step 5: Update the Database
The database settings must be updated to reflect the new domain name information.
- Log in to your Bluehost control panel.
- Bluerock Account: click the Advanced tab from the side navigation menu to the left. Look for the Database section, and click on thephpMyAdmin icon.
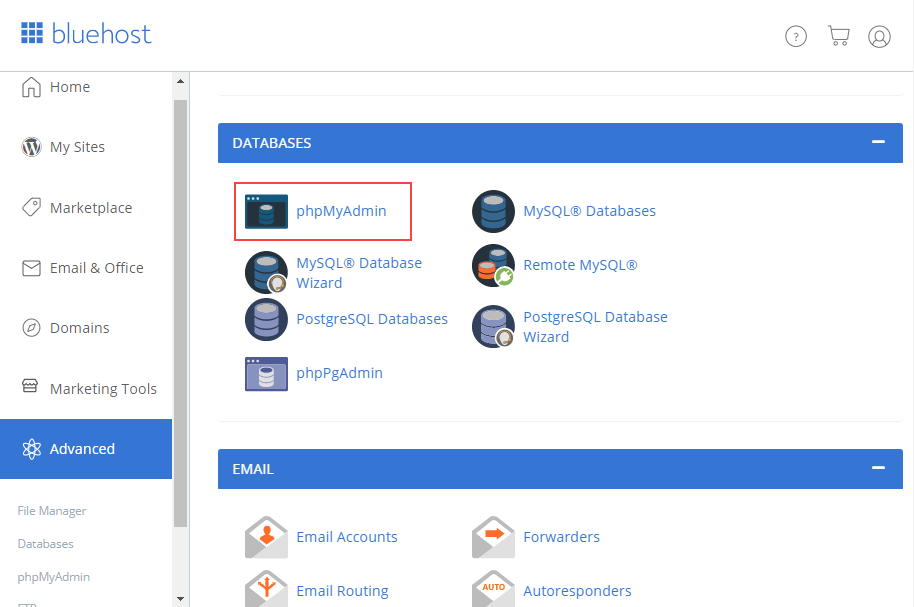
LegacyAccount: click the cpanel option from the navigation submenu at the top of your screen, then look for the Database tools section.
- In the left navigation panel, click on the newly created database name.
- In the left navigation panel, clickwp_options.
- ClickEdit on the siteurl line.
- Change the primary domain name to the addon domain name, then clickGo.
- ClickEdit on the blogname line.
- Change the blog name to reflect your new blog, and clickGo.
- ClickEdit on the blog description line.
- Change the blog description to reflect your new blog, and clickGo.
- In the left navigation panel, clickwp_users.
- ClickEdit on the theuser_login line and change the user name to reflect your choice's new login username.
- On the user_nicename line, change it there as well. For security purposes, do not use Admin as either username.
- On the user_pass line, highlight and delete the characters already in that box.
- Create a new password of your choice.
- To the left of that is the varchar(64) box; click the down arrow and selectMD5.
- ClickGo.
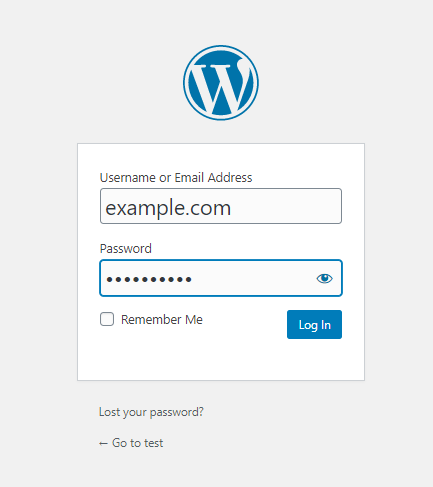
You can test these changes by visitinghttp://yourblogname.com/wp-login.php (replace yourblogname.com with your actual domain name).
You should now be able to log in to your newly imported WordPress site.
Step 6: Update the Database Tables
Once the domain is working, and you can log in to the WordPress Dashboard of the new site, install the Search and Replace plugin. It will allow you to search all of the tables in the database, search for your old domain, and replace each instance with your new domain. You can uninstall the plugin after the tables have been updated. In addition to the database, you should check your site for any links hard-coded into widgets, etc. Those links will need to be manually edited to reference your new site address. For additional information on using this plugin, please review the following article:
- Using the Better Search and Replace Plugin
Step 7: Update WordPress
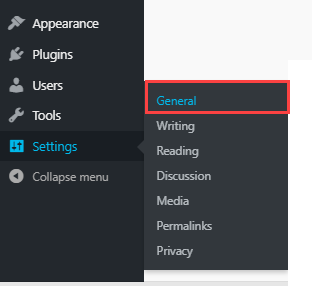
- Log in to your WordPress Dashboard.
- In the left navigation menu, go toSettings.
- ClickGeneral.
Be sure that each of the following fields displays your new domain name and not the old one:
- WordPress Address (URL)
- Site Address (URL)
Note: If you are unsure whether the account uses the Legacy or Bluerock interface, please see Bluerock vs. Legacy to determine which steps to follow.
For further assistance, you may contact our Chat Support or Phone Support via888-401-4678. You may also refer to our Knowledge Base articles to help answer common questions and guide you through various setup, configuration, and troubleshooting steps.
How To Change Blog Domain Name In Wordpress
Source: https://www.bluehost.com/help/article/wordpress-manual-domain-change
Posted by: jaramilloicia1942.blogspot.com
0 Response to "How To Change Blog Domain Name In Wordpress"
Post a Comment